REVO Ultra: Mobile app

Contents
REVO Ultra
The app is available for both Android and iOS devices (iPhone, etc.).
The app supports connection via P2P cloud account, live viewing and playback to name a few.
Android
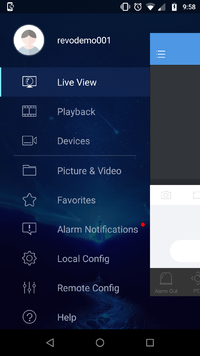
Live
Favorites
Favorites saves a view (layout) of cameras in the order and stream quality being used.
How to save a favorites:
- First, select a layout (2x2, 3x3, etc.), load cameras into the empty channel slots (yes, they can be from more than 1 NVR).
- Next, click the "Favorites" button at the bottom.
- Lastly, give your new favorites site a name and save it.
That's it. When you go to load live cameras, choose your favorite site name you saved and it will load it as you saved it.
Example:
Playback
To playback video recorded on the NVR with the app, tap the menu button and click "Playback". This will bring you to the Playback screen.
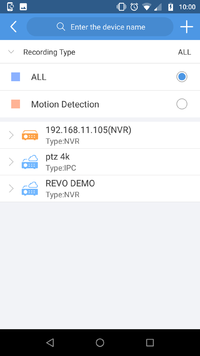
Once the "Playback" page is displayed, tap on "+" and select a camera and then select a date & time from an accessible NVR to search video from.
After the video loads it will automatically start playing.
Example:
Camera selection
From the Playback screen, click the "Camera+" button (top right corner). Next, tap on the NVR name to drop down a list of connected cameras. Choose one or more cameras by click the "O" on the far right of the camera. To select all cameras from the NVR. Tapping it again will not unselect all cameras.
Example:
Timeline manipulation
For fine tune searching, you can "zoom" the time line in and out.
- First, you need to load a camera and choose a time and date.
- If there is video there it will pull up the video. Once it's loaded, the time line will appear at the bottom.
- Hold and drag the time line left or right to go to a different time.
- With two fingers, place them on the time line. Slide your fingers apart to zoom in and slide your fingers together to zoom out.
|
Example:
Recording Type
The choices are currently: All or Motion Detection.
To choose, enter the Playback window (), then after you tap on the "+" to choose a camera from an accessible NVR, at the top will be a "Recording Type" bar.
Tap on the bar and choose what type of video you want to playback.
Split
Another new feature that has been added is the ability to "split" the playback time line. What this means is, initially starting with your first time selection, you can "split" that camera's recorded video and look at a still image 30 minutes apart. The time line can be split up as a 4 split (2x2) or 9 split (3x3). Once the images load the first time it's been split, it will display the start and end time of the split. From here you can click that time line and choose a different starting and end time, splitting the total amount of time evenly between the split time line (images).
Here is a small clip showing the "Split" feature in action:
- Screen Shots
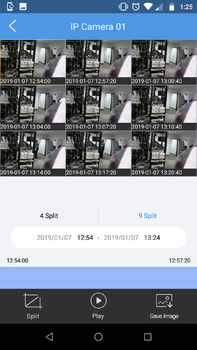
9 Split 
4 Split
PUSH
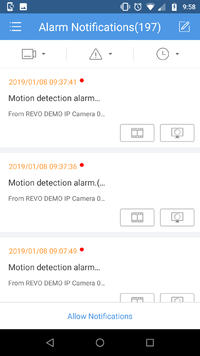
Advanced Options
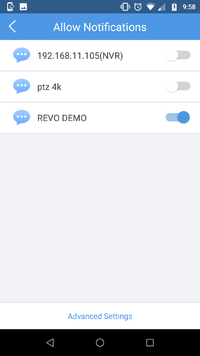
The "Allow Notifications" window will allow you choose which NVRs or Cameras to receive notifications from.
Here is a short clip showing the use of these new advanced feature:
Filtering
Another new addition is the ability to filter the PUSH notifications you've received.
Filters include: Camera/NVR, Event Type and Time (received)

Filter by Camera 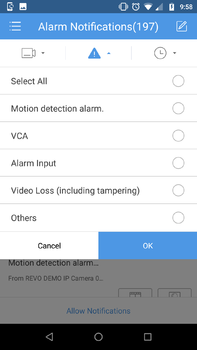
Filter by Event Type
Here is a short clip showing the notifications filter in action: